Stardew Valley Map FAQ
On April 2, 2025, I set out on a journey to crochet the Stardew Valley world map pixel for pixel. If you’re not sure what some of those words mean, or if you’re interested in how I did it, you can find more information about the project below. I have turned on comments for this post, so if you have more questions you’d like me to add to the FAQ or points you’d like me to clarify further, you can let me know here! I will also be posting a secondary resource in the coming months with more information about my process, as well as some longform content that will include more in depth information and visuals, so if you would like to learn more about how to make something like this yourself, be sure to subscribe to my YouTube channel.
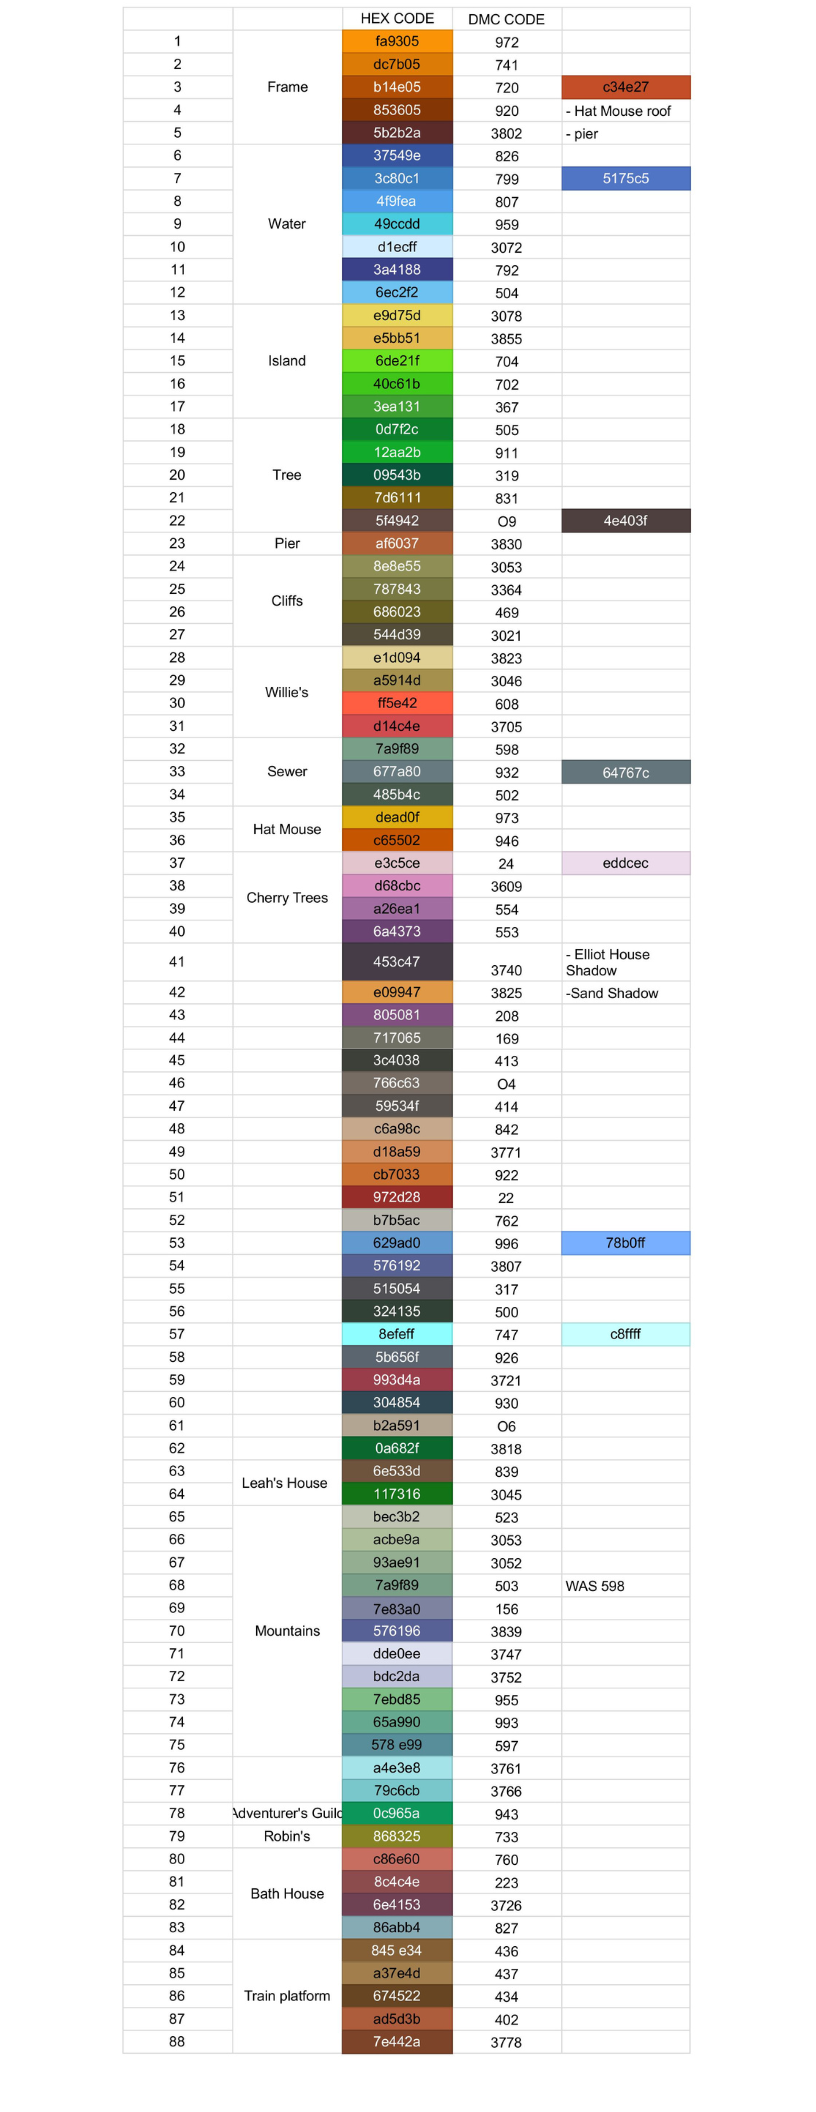
I have included the list of colors I used as a png at the bottom of the FAQ for the moment, but I will be moving the color list to a new blog post in the future. My aim is to reconfigure the color list into a more comprehensive and accessible resource that is better for visibility and screen reader compatible, I just need some more time to make that happen.
Frequently Asked Questions
-
I’m using a 1.3mm hook, which is about as small as you can go with the “yarn” I’m using.
-
I’m using embroidery floss for this project rather than traditional yarn. I use the full 6 strands of the DMC 6 strand, so the size is roughly equivalent to fingering weight yarn. DMC is available in most craft stores, but I’ve been sourcing specifically from 123stitch.com. They also have floss cones available, which came in handy for two of my colors.
I’ve also had some questions about how I keep my floss organized, and for that, I store my bobbins in coin collector sleeves. Unfortunately, I haven’t found another place to order them from other than Amazon, but if you know a guy I would love to hear about it! For bobbins, I recommend sheets that fit 12 per page. Sheets that fit 20 per page also work, but it can be a little bit more difficult to get your bobbins in and out.
-
Embroidery floss is roughly the same size as fingering weight yarn, but there are factors other than size that lead me to choose it for this project. The primary reason I use floss is the color options that are available to me. I haven’t found any brand of conventional yarn that even comes close to having as many colors, especially not in all the shades that I need. Most yarn brands are also going to prioritize making colors that generally look nice on their own. Embroidery floss’ use as an almost painterly material, on the other hand, means that there are a lot more unusual or less conventional shades available.
Size was also definitely a factor, though. The first time I crocheted with embroidery floss, I was specifically looking for a way to make something small scale. While an enormous, blanket sized version of the map would undoubtedly be very cool, it would also be a lot more physically taxing to work on.
-
I used 88 unique shades of embroidery floss to make the map. If you look at the colors used in the digital version of the map, there are even more, but a digital color picker has infinitely more options than there are available physically, so it became necessary to trim that list down a little bit. Some colors were so close together they we basically indistinguishable to begin with, and some colors were visually distinct, but still overlapped when it came to picking out the closest color of floss. I probably could trim this list down even more if I wanted to, but not by enough to make much of a difference.
-
My process for picking out colors underwent a little bit of an evolution in the early stages of the map. Joann was still around when I started, so I was able to go into the craft store and pick out floss in person. I did run into a little bit of a flaw in that plan as the lighting that Joann used did lead to some color distortion, so I would often come away wishing I’d made slightly different choices, but nothing so significant as to cause a real problem. After Joann closed, I moved my shopping online. I had plans to order a wide range of different colors and build up my own floss library so I could continue to make color comparisons using something physical. This was not the best plan that I’ve ever had. Fortunately, I discovered the DMC color card, and that really saved the day.
My process became: color pick all the unique shades in a given section of the map, pull them up one at a time in HTML color picker so that I could see a larger swatch, and hold the sample book up to the computer to compare. This may sound like a pretty inelegant process, but I have very important reasons for why I do things this way (and some very important restrictions).
Time of day matters A LOT. I only use natural light when I’m comparing colors. Yellow light, like the kind my desk lamp gives off, causes wild distortions. It also matters which monitor I’m using for color comparison. I discovered at one point in the process that one of my monitors is slightly more red than the other, which was definitely causing me to make some bad, or at least inconsistent, choices.
While the original artwork of the Stardew Valley map may be a digital piece, the map that I am crocheting is not. There are programs online that will show you the closest floss color to a given hex code, but that is still a digital swatch. It doesn’t show you how the floss will look in person, or how two shades will look when you put them next to each other. This second element was tricky even for me. The sample book is great for comparing from book to monitor, but not so helpful when you want to see what two floss colors will look like side by side. This matters because many of the colors on the map are meant to communicate the effect of light on the landscape, i.e. green grass in the sun and that same grass in the shade. While tone is part of what makes a given color look like the shadow of another, hue is also a crucial factor. As a general rule of thumb, warm colors come forward while cool colors recede, so when choosing the color for a shadow, you want the shade of the shadow to be a cooler tone than the shade of the object under light. (If all of this sounds like gibberish to you but you want to learn more, I will be doing a whole video breakdown on color theory for crocheters in the future). Making sure that the two colors I’m choosing are distinguishable from one another in both tone AND shade is therefore very important to the success of the piece.
-
I am always asking myself “what next?” It’s kind of an inconvenient quality sometimes, and I have regretted it in the past. I get bored very easily unless there’s something new for me to learn. Working in traditional employment, I was always ending up in management roles through some kind of twisted osmosis. I would learn my role, get bored, look for something else to do, and before I knew it I’d saddled myself with a bunch of responsibility I don’t want all in the name of making my day a little bit more interesting. At least, for a little while. It’s the same with crochet, but in a much more fun way. Every project is a stepping stone—something to grow from. Learning new things is so enjoyable to me, and I love being able to take my time and teach myself. Prior to working with embroidery floss, the smallest I’d gone was a thin DK weight yarn and a 2.5mm hook. When a friend commissioned me to make Alex’s portrait (also from Stardew Valley) I made my first piece with embroidery floss and a 1.3mm hook. I went on to make Sebastian’s portrait for myself from there, and while I do still plan to work on more of the Stardew Valley portraits, I couldn’t resist the temptation to top myself. The map had been on my radar for a while, and I’d been planning to wait on it, but there’s really no time like the present. Fiber arts are slow to make, which I find very comforting. That means there’s plenty of time to play around and try new things.
-
When I think of a pattern, I think of written instructions, so by that metric, no, I am not using a pattern to crochet the map. I would say, however, that I am using a chart. It just isn’t one made with crochet in mind. The original artwork for the Stardew Valley map (and, in fact, the entire game) is pixel art, which means it’s perfect to use as is for a crochet pattern. 1 pixel translates to 1 stitch, simple as that. I pulled my original reference straight from the Stardew Valley wiki, but I’ve since found a much better website called Spriters Resource for sourcing images from the game. The images are very very small because they’re pixel art, so opening them in a program that’s designed to get very close to the canvas is a must. I use Piskel, which is an open source sprite editor that can be used in your browser. There’s also an app you can download, but if you don’t have a lot of space on your computer, you don’t have to resort to that. It’s important to note that the map is actually pretty large when it comes to pixel art, so it’s not ideal for a program like Piskel, but since I’m not making any edits to it, it holds up just fine.
You can also check out bunia_xstitch on Instagram if you are looking for more guidance. They have free cross stitch patterns available for all the map’s seasons, which could still be very helpful for crocheters.
-
Since I’m not using a pattern, I really have to pay attention to the specifics of the stitches that I’m making, but I find this to be pretty easy, honestly. The map has lots of unique shapes and colors going on in any given row; the stitches that I am working into therefore become as much of a guide as the artwork itself. If I notice that I am supposed to be crocheting into a white pixel but the pixel I am working into is green, I know I did something wrong somewhere and need to take a second to check my work. I do mark off the very end of every row as I finish it, and I periodically cut off the bottom of my reference image so that it’s easier to keep my place while I’m working, but that’s the extent of my technique.
-
The technique I’m using is called tapestry crochet. A few other helpful terms to search up would be intarsia and pixel grid crochet. A lot of the names for colorwork have specific techniques attached to how they handle yarn on the wrong side (though I really think this is more true for knitting than it is for crochet, which is much more freeform). I am not using any one color changing technique in my work. With a project like this that involves so many different colors applied to such an inconsistent motif, you have to be a little flexible. I have a video that talks more about this, if you are looking for tips.
A few more specs for you: I am using single crochet, I turn my work, and I am working from the bottom up because that keeps the piece visually consistent with my reference.
-
In my opinion, there are a few things at play here: experience, size, and tension. When I started the map, I had seven years of crochet experience under my belt, so that definitely contributed to my consistency throughout this project (pro tip: granny squares are a great way to practice keeping consistent tension). I am definitely not perfect, though, and I think that it’s a bit easier to see, now that the map is nearly complete, that there are areas of warping in the fabric. That’s where factors 2 and 3 come into play. I am using such a small hook and “yarn” to make this project that it becomes difficult to pick out inconsistencies and mistakes. I am turning my work, so that means I am producing that characteristic vertical zigzagging from one row to the next, but it’s much harder to see because, at this scale, your eye starts blending everything together. I am also using roughly the smallest hook I can get away with for this “yarn”, which means I don’t have to hold a lot of tension (and in fact, it’s a bad idea to even try). Allowing my hook to take the lead and determine the size of my stitches means less room for error.
-
The map is 400 stitches wide and 244 rows tall. I will take final measurements after I have finished crocheting and blocking the map as it is difficult to get an accurate measurement in its current form, but I estimate that it will be more than 3.5 feet wide and 2 feet tall.
-
I really hate timing myself while I work, so I don’t have the exact numbers for how much time I spent working on the map. Thinking on a large scale, this project has taken me a full year. I started it on April 2, 2025 and am projected to finish on April 8, 2026. I planned two breaks during this time, so I wound up with 51 weekly updates. In terms of hours, I would estimate each row took somewhere between 1.5 and 2.5 hours to make. The rows at the top and bottom of the map certainly went a lot faster than the ones in the middle. If we take the average and call it 2 hours per row, then I spent roughly 488 hours on this project, but I’ll be honest, I think that’s lowballing it. When you take into account my human inconsistency and the time spent doing things other than just crocheting (like color matching) I would think an estimate of around 600 hours sounds closer to correct. To help you conceptualize that amount of time, that would be like if I spent every hour of a 40 hour work week only working on the map…for almost 4 months.
-
My goal with the map was to crochet the most generic version of it. I found the image I used for my reference on the Stardew Valley wiki, downloaded it, and that was that. It would have been easy to go in and change things like the farm type, but I wasn’t really looking to customize. A lot of the changes that happen to Stardew Valley through the course of the game also don’t appear on this map the way that people think that they do. Joja Mart and the Community Center, for example, look the same regardless of where the movie theater goes. Vendors like the travelling cart and bookseller also do not show up unless you have mods.
The seasons do change on this version of the map, but I had honestly forgotten about that when I was starting this project. I believe that prior to the 1.6 update, this was not the case. Even if I had remembered, though, I probably still would have chosen the Spring version of the map. I have restarted the game countless times in all my years of playing, so when I think of Stardew Valley, I think of the map in the Spring.
-
It’s important to remember that you set the pace for your projects. You get to decide what works for you and what doesn’t. When I set the pace for my projects, I consider things like balancing my time. I have extensive experience with burnout and just how detrimental it can be. I’ve also had repetitive strain injuries multiple times in my past, so I am aware of how important it is to be careful with my body and take breaks as I need them. I organize my workflow so that it’s healthy for me, which means I don’t worry about trying to make the back of the map look neat or manage my ends as I go. I don’t find that manageable. I would rather handle all of that as a secondary process once the crocheting is complete. That’s the way that I’ve worked on things in the past, so I know that that’s what works for me. If weaving as you go, or not weaving at all, or cutting lots of short pieces of yarn to use, or carrying every single color—just to name a few examples—is what works for you, then that’s the way you should do things. Don’t get me wrong, when trying out a new technique I would still advise testing on a smaller, less consequential project first. Whatever you’re doing, you want to make sure it will maintain structural integrity and won’t cause more problems for you, but at the end of the day, it’s your project, just like this is my project. I work in the way that works for me, and that’s enough to keep the map from feeling overwhelming.
-
I am planning to mount the project once it’s done. I will first clean up the ends by making sure everything is tied off and trim some of the excess, leaving my tails roughly 2 inches long to keep my knots from unraveling. After everything is knotted, I can block the project. I almost always wet block my crochet as I just find it the most effective method. I will then coat the excess threads on the back side with a very watered down glue just to keep them flat and reduce the chance that they might come unknotted. I don’t want a lot of glue as I’m not trying to make the project rigid, just enough that all of the excess thread is kept tidy.
While the piece is drying, I will prepare the backing board. I use a rigid board cut to size for projects like these. For a large pieces, I drill holes through the backing board itself to run my hanging wire through so that no tension is placed on the crochet itself. I will cut a piece of felt slightly larger than my backing board so that I can wrap it around the edges. The crochet is then sewn to the felt, trapping the cut ends of the felt in between the two fabrics along with the backing board. This results in a piece that is mounted on a flat, hangable panel. I will be making a video about this process if you would like more information on how to do it yourself.
I am opting to mount the piece rather than frame it as the crochet itself already has a frame built into the piece, so I want to utilize that element of the motif in the finishing process.
-
I am not weaving in any ends! It really isn’t necessary for this project as the back will be covered anyway, and in fact, I think that trying to weave in the ends would be detrimental to the finished product as it is likely the fabric would become warped.
-
I’m not really interested in selling this project. It has a lot of sentimental value for me that I would find difficult to price. It was also so time consuming to make that I couldn’t make it affordable to purchase even if I did want to sell it. I’ve tried to conceive of what I feel would be a fair price for this piece so many times throughout the process and the number just keeps getting bigger. If I have to pick a number, I can say that I would not consider parting with this project for less than $15,000 USD, though I’m still not sure that would be enough. It would also have to go to the right person.
Color List
I am hosting the list of colors I used to crochet the map here for now, but I will be moving this list to a new blog post in the next month or two. My aim is to reconfigure the color list into a more comprehensive and accessible resource that is better for visibility and screen reader compatible, I just need some more time to make that happen. If you would like to support me in this work, you can find a tip jar on the home page.